Automount share
The example used in this blog is a CIFS share from a Samba server running on a Raspberry Pi mounted on demand by a client running Debian.
Goal
The goal is to have a share on a client that is dynamically mounted. The share should only be mounted when an app needs to access.
In my case I do have a server with a data storage share connected. The storage is made available to clients in the network. To not have the share being mounted by the clients all the time, the share should be mounted only when real demand exists. For instance, an app needs to read data from the share. If the share is not needed by the client, it should not be mounted.
Process
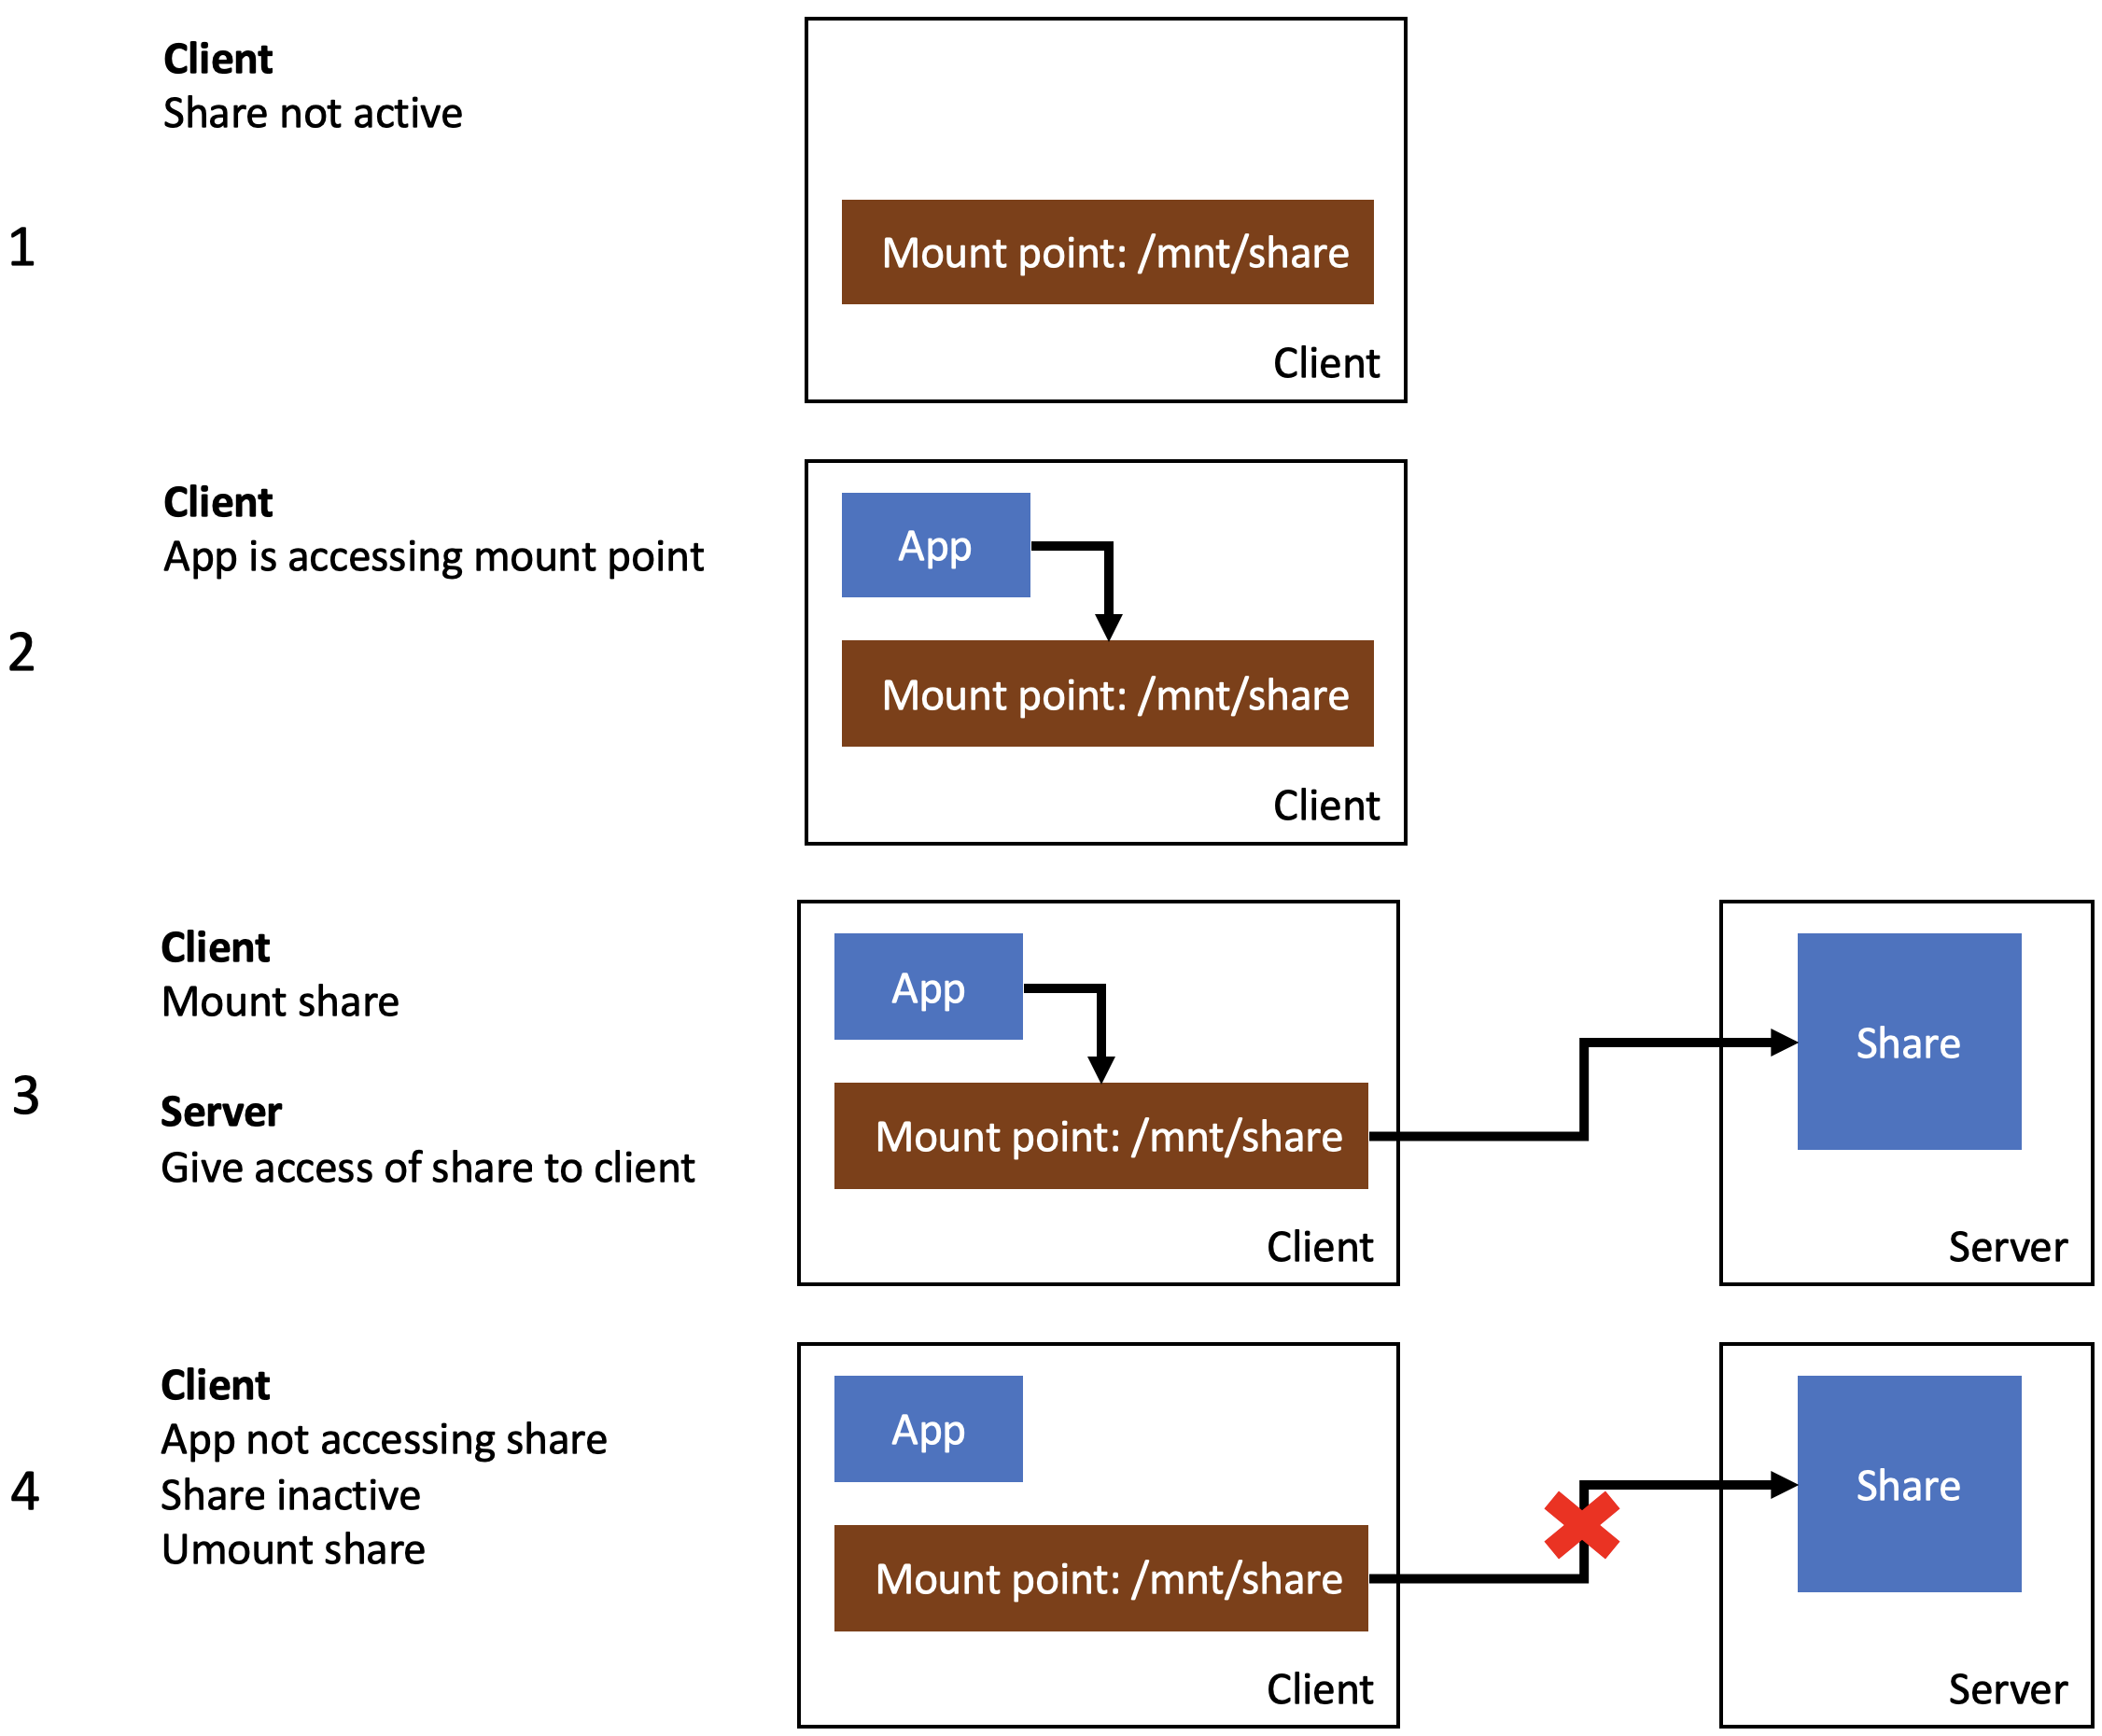
To understand the scenario better, take a look at the picture below. The process can be separated into 4 steps.
- Step 1: the client is configured, but the share is inactive.
- Step 2: An app is accessing the share. This can be an app as simple as ls /mnt/share
- Step 3: The client is connecting to the server and mounting the share to the local mount point /mnt/share. The data is now available to the app.
- Step 4: The app is not using the data from the share any longer. After a timeout, the client disconnects the share.
The example is using for the server a Raspberry Pi with Raspbian and for the client a Debian based system (Proxmox). As share type, CIFS is used. On the client, Samba is running and configured to give access to a named user to the data storage.
Installation
Server
Install Samba and configure access for a named user. This is not part of this blog.
Client
Autofs is the package and tool taking of mounting shares automatically. Install it using apt-get.
apt-get update
apt-get install autofs
Configuration of autofs
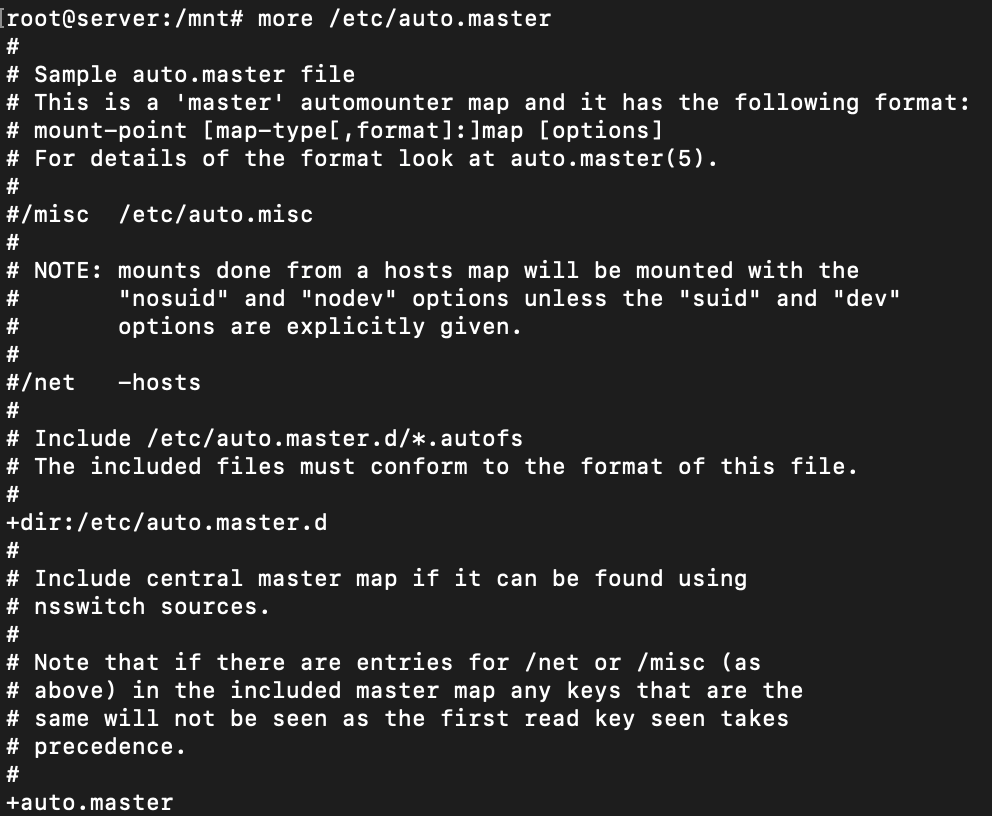
Autofs needs to be configured. To make it easier, the packages comes with templates. I am going to use the autofs master template as my starting point. Take a look at the master template as it contains an explanation of what is needed.
cd /etc/auto.master
more /etc/auto.master
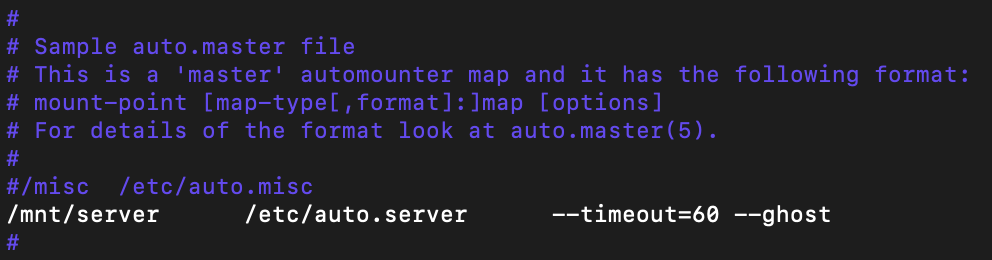
To add an auto mount share a new line must be added to the file. The format is: mount-point file options.
Before adding the line, you first must understand how the template and autofs works and what you want to achieve. First parameter is for the local mount point. The directory informed here is the parent. The actual shares mounted are created as sub-folders in that directory. For instance, if you choose /mnt/server and the remote share is data, the final mount point will be /mnt/server/data. I am going to mount the remote share to /mnt/server.
The seconds parameter is for the configuration file for that mount point. The third parameter specifies how autofs is treating the mount point. To unmount the share after 1 minute of inactivity, use option –timeout=60. The ghost option will create the subfolder even in case the server is not reachable.
Edit master template
Add a new configuration line for mounting the server share
/media/net /etc/autofs/auto.net --timeout=60 --ghost
Mount configuration
The actual mount configuration for the share is specified in the file /etc/auto.server. Create file /etc/auto.server and edit it.
touch /etc/auto.server
vim /etc/auto.server
Insert mount options.
- [username] – name of user used to connect to Samba share
- [password] – password of the user
- [remote_server] – IP / server name of the Samba server
- /data – name of the share configured at Samba. In case you have a share configured named Music, or Fotos, or Work, substitute data with the correct share name.
data -fstype=cifs,username=[username],password=[password] ://[remote_server]/data
Save file
Change permission
chmod 0644 auto.server

Start autofs as service
Stop autofs and start it in debug mode to see if the configuration works.

If it worked, exit and start the service.
systemctl start autofs.service
Test
To test, go through the 4 steps described in the picture at the top of this blog.
Step 1
Client is ready. Check the mounted volumes. You will see that no CIFS volume is available.
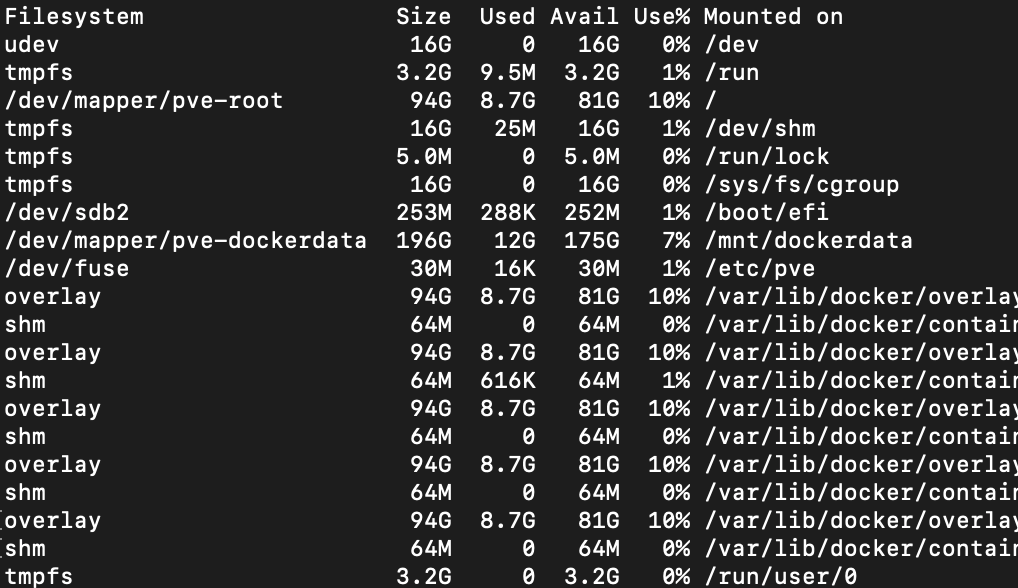
Using mount, you can see that the mount point is available.
/etc/auto.server on /mnt/server type autofs (rw,relatime,…
![]()
In the parent mount point for the CIFS share, autofs created the folder data.
![]()
Step 2 & 3
Run an app that is accessing the share
ls /mnt/share/data
Accessing now the content of /mnt/server/data will automatically mount the CIFS share.
df -h

Mount
//192.168.0.164/data on /mnt/server/data type cifs (rw,relatime
![]()
Step 4
Assure that no app is using the share and wait until the specified timeout occurs. Check with mount and df to see that the share is umounted.
Additional information
Start / stop autofs service
Start service
systemctl start autofs.service
Stop service
systemctl stop autofs.service
2 Comments
Rayman · July 6, 2021 at 21:10
Start service
———————
systemctl stop autofs.service
Stop service
——————-
systemctl stop autofs.service
My question:
You type “systemctl stop autofs.service” twice for run and stop ??
For START you need “systemctl start autofs.service”
Cheers Ray
Tobias Hofmann · July 7, 2021 at 10:26
Hi Ray,
just a typo, thanks for reporting it. It’s now fixed.