Replay UI tests
In my blog posts about UI testing I explained the benefits of UI testing and how tests can be recorded by the end user. The benefit is clear: capturing the interactions directly from a user of the app. These UI tests can serve as input for visual regression tests. Test scenarios can be built and no coding is required in doing so. The UI tests recorded in the last article are available in my repository. They serve as the UI tests reused in this post.
The recorded tests capture actions a user takes when working with the app. These might involve complex actions where several steps are run in sequence. When a use needs to fill in values using different value helps for filtering and finding an item and navigates to its detail pages. These interactions can bring visual regression testing to its limits. Those are better used to check the final result of an action or to validate individual UI controls. For instance, a visual regression test would check each value help dialog in a separate test instead of calling all of them in one single test.
This is the discrepancy between visual regression tests and user journey-based tests. Both contribute to the goal of app testing: validating the correctness of an app. Yet, the user journey tests are the ones that count. What does it help when the detail page looks exactly as planned, but the user cannot access the page because the app breaks when selecting the necessary filter values? The goal of the user recorded UI test is exactly to check if a certain user journey is working. That the layout of dialogs, controls like tables or detail pages works as expected is not the primary goal of those tests. They rather validate if the app works from a functional perspective. Validating whether the app loads correct data is a side effect. When the user actions are to filter table entries for status open and to select an entry with a certain name; this can only work when the entry is in the filtered result. When the user flow is to access the detail page of a travel, this only works when the travel exists. What is not tested if the layout, the UI changed. When a user is running the tests, this is validated indirectly to some degree. By replaying the tests automatically, this validation is skipped. It’s not part of the test objective.
Running UI tests automatically is needed to ensure a certain quality of the app. This requirement reveals a problem with the tests so far: running the UI tests is a manual process:
- Open Chrome Recorder
- Select test to run from list
- Run test
- Check result
- Select another test
- Repeat steps 3. to 5.
This is doable for a small set of tests. In case your test list grows, all these manual steps will cause an additional workload on the test / user. Besides blocking the browser while the tests are running this is a time-consuming task. This will make users stop running the testing. A solution to this is problem is to take the UI test recordings and let them run automatically in a test suite. Now the user generated UI tests are handed over to the developer. The developer is using those tests to run them as-is. They must not be adjusted by the developer by changing the execution flow, taking away or adding steps. The task of the developer here is only to ensure that the tests are part of a test suite and are executed automatically. This is where this task differs from traditional test writing: the test is not given as a user story in plain text. It is not given as text that leaves interpretation by the developer what the test should do. The test is already defined and finalized by the end user.
Example: Replaying UI tests
Letting users’ hand over their tests is easy. The Chrome recorder allows to export them in JSON format. The developer can easily reuse these tests for test automation using replay. The following example is showing how this works.
Step 1: Project setup
The testing app is going to test the SAP SFLIGHT demo app. The testing app is a new, separate app and not part of the app under test. Start with creating a new npm project.
Initialize a new folder and initialize a npm project.
npm init
Install replay
Add replay and puppeteer as dependencies to the project. Install replay and puppeteer locally.
npm i @puppeteer/replay –save
npm i puppeteer --save
This is the status of the project after checking out branch: 1-initialize-project.
Step 2: Add Chrome test recordings
Replay can use as input tests that are in the puppeteer JSON format. The Chrome test recorder offers the option to export recorded test in that format. Open a test (1) and export it as JSON (2 + 3).
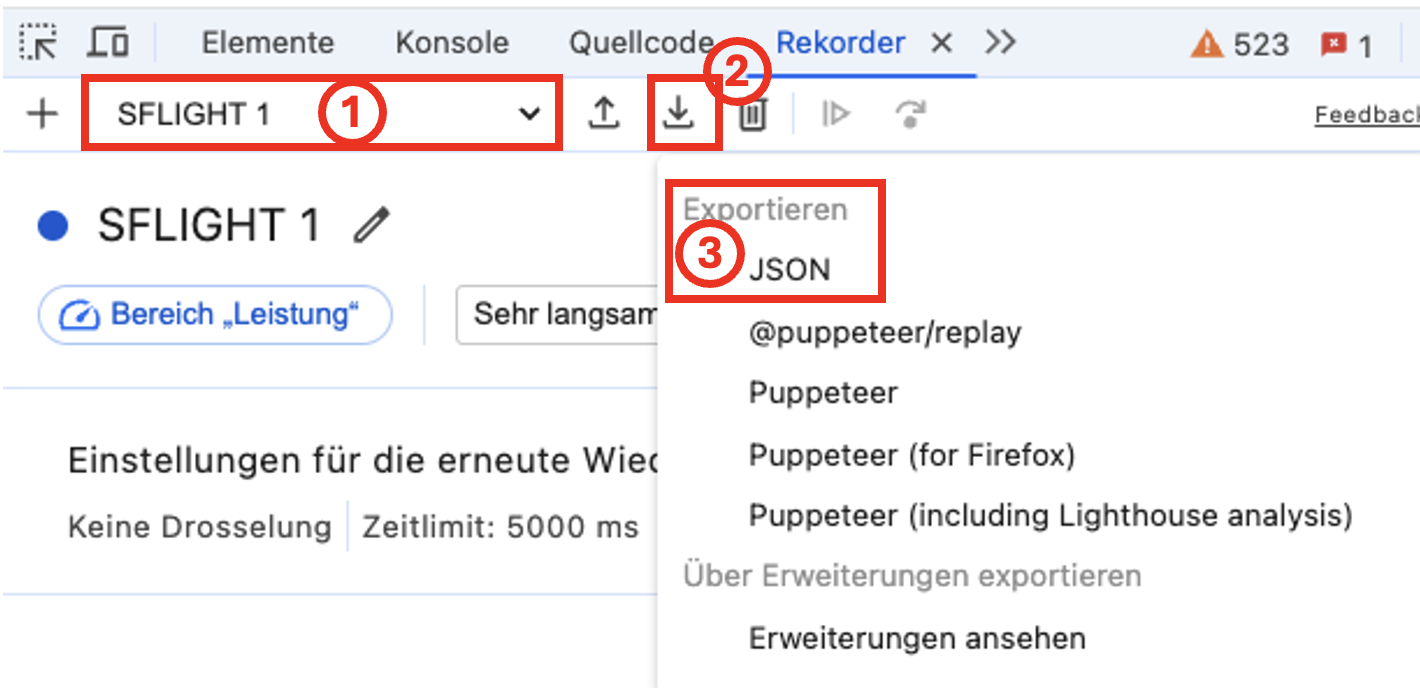
In the last blog post, 3 UI recordings were created.
- Filter the table by selecting filter values from the value help and navigate to the detail pages. Test recording: SFLIGHT 1.json
- Select an entry from the table and navigate to the detail pages. Test recording: SFLIGHT 2.json
- Filters the table as in test 1, but the filter values are entered by keyboard. Test recording: SFLIGHT 3.json
Add the recordings to the project. They can be either exported from your Chrome browser as JSON files in case you recorded them earlier or downloaded from my repositories.
Create a new folder named json in the project and save the test recordings there.
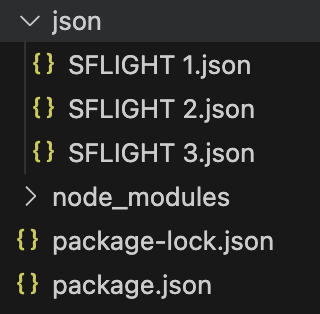
This is the status of the project after checking out branch: 2-add-test-recordings.
Step 3: Configure replay
Replay can run test in the JSON format.
npx replay json
To run it as test command from npm, add it as a script to package.json.
"scripts": {
  "test": "replay json"
},
This is the status of the project after checking out branch: 3-configure-replay.
Step 4: Run tests
Everything is set up to run the tests. Verify that the demo app under test is running. Run the recorded tests.
npm test
This will result in a failed test run.
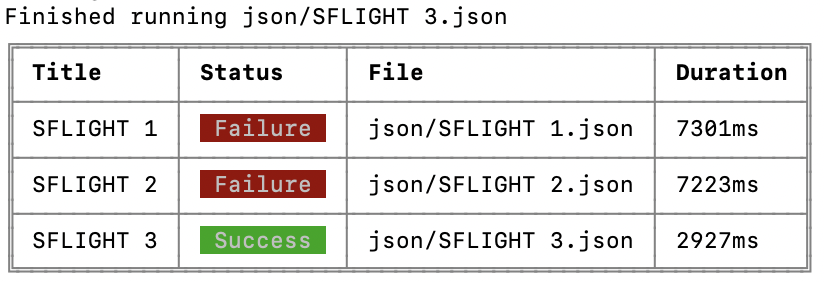
Both tests SFLIGHT 1.json and SFLIGHT 2.json will return a timeout error.
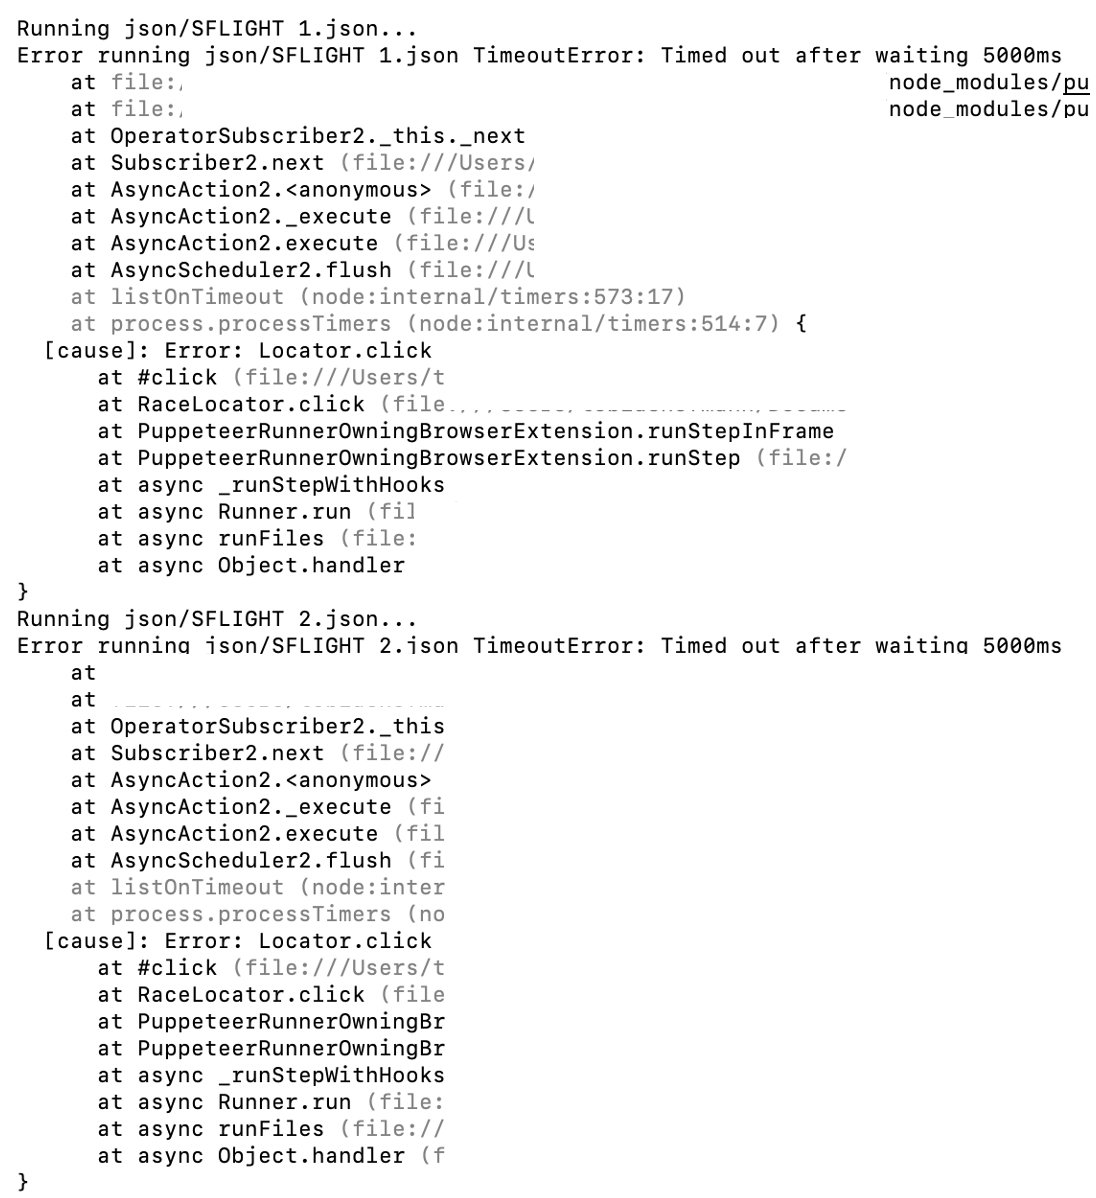
The error is caused by Locator.click. An element that is defined in the JSON test file cannot be found and a timeout is thrown by the browser after waiting 5 seconds.
Why is this happening? Running the test with the Chrome recorder from the browser works. The recorded test contains a series of actions to take: enter filter values via value help, filter the table, select an entry from it, open the detail pages. Here is a video of the test:
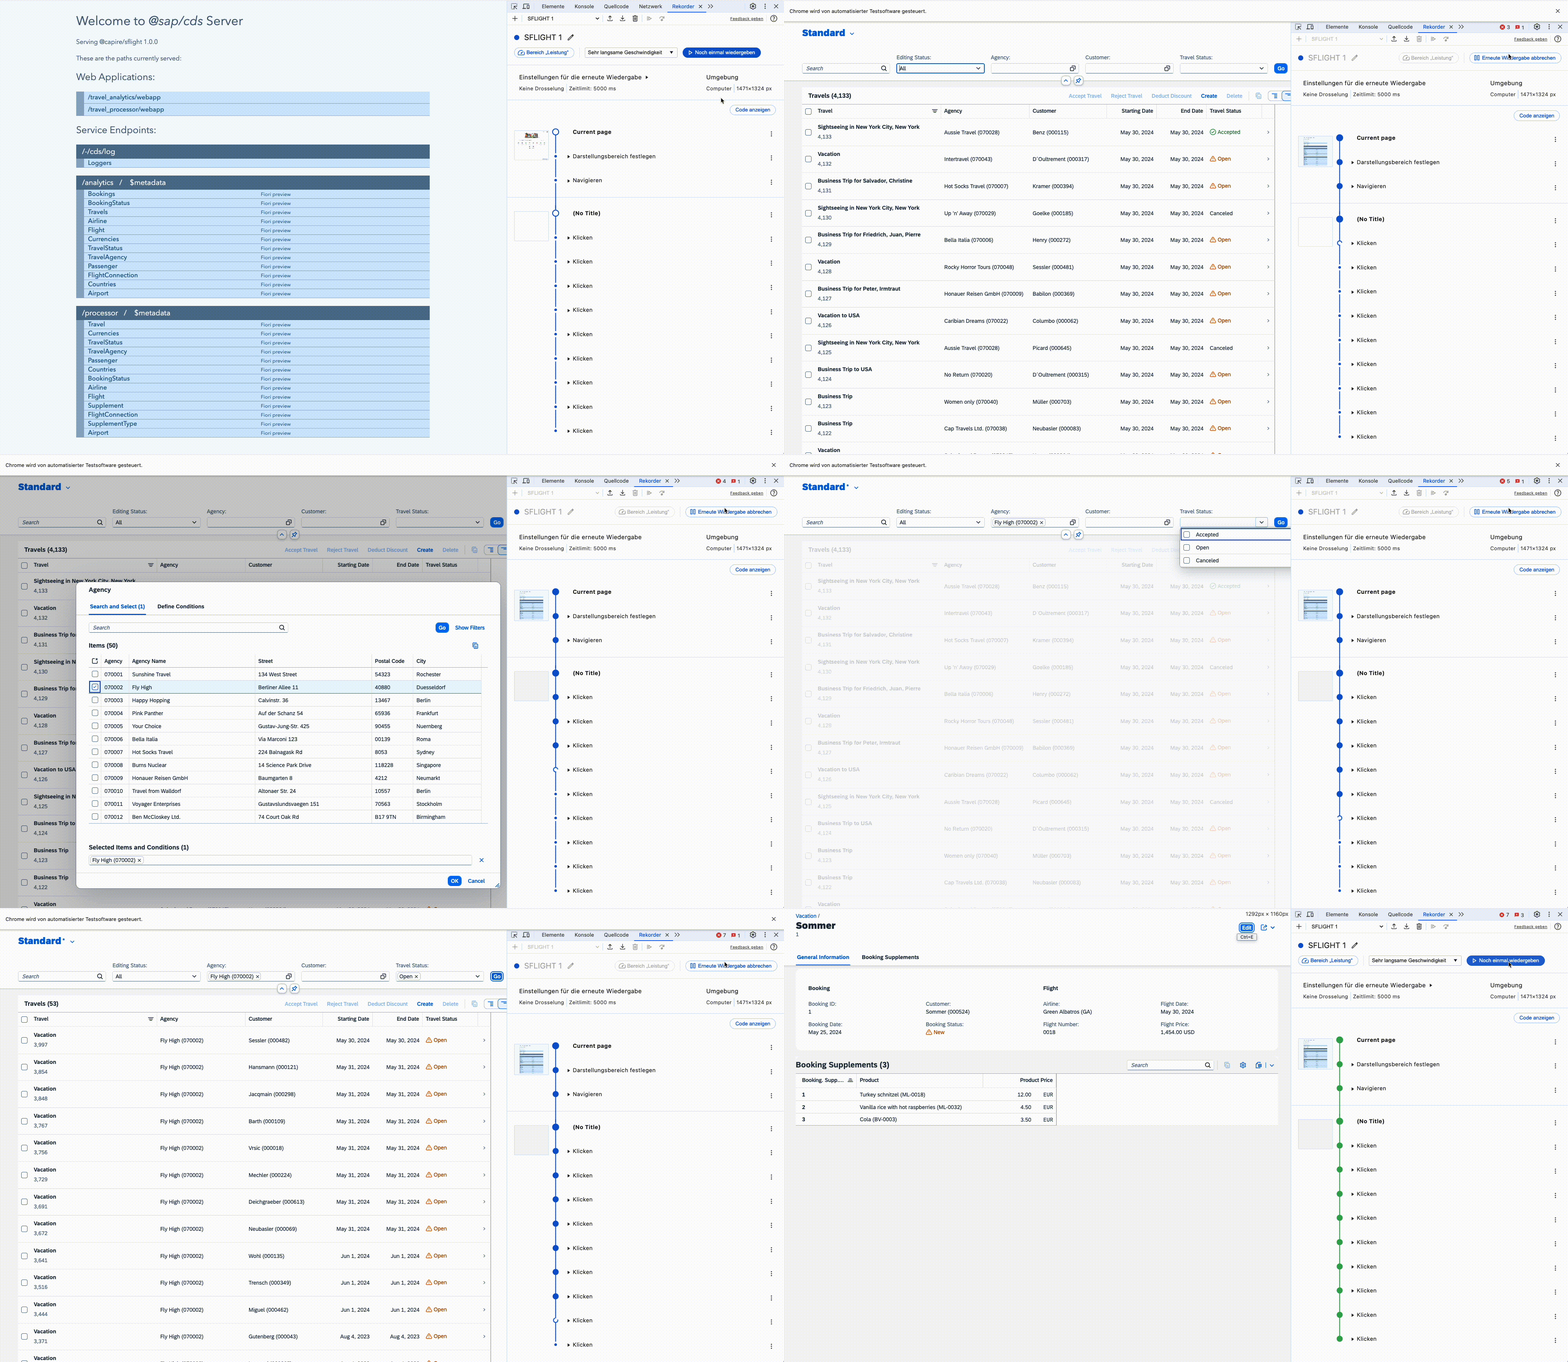
However, running the tests via puppeteer and replay results in a timeout.
An individual test can be run by providing the JSON file as the only parameter to replay. Running the SFLIGHT 1.json test:
npx replay json/SFLIGHT\ 1.json
The result is the same error. The output shows the possible parameters.
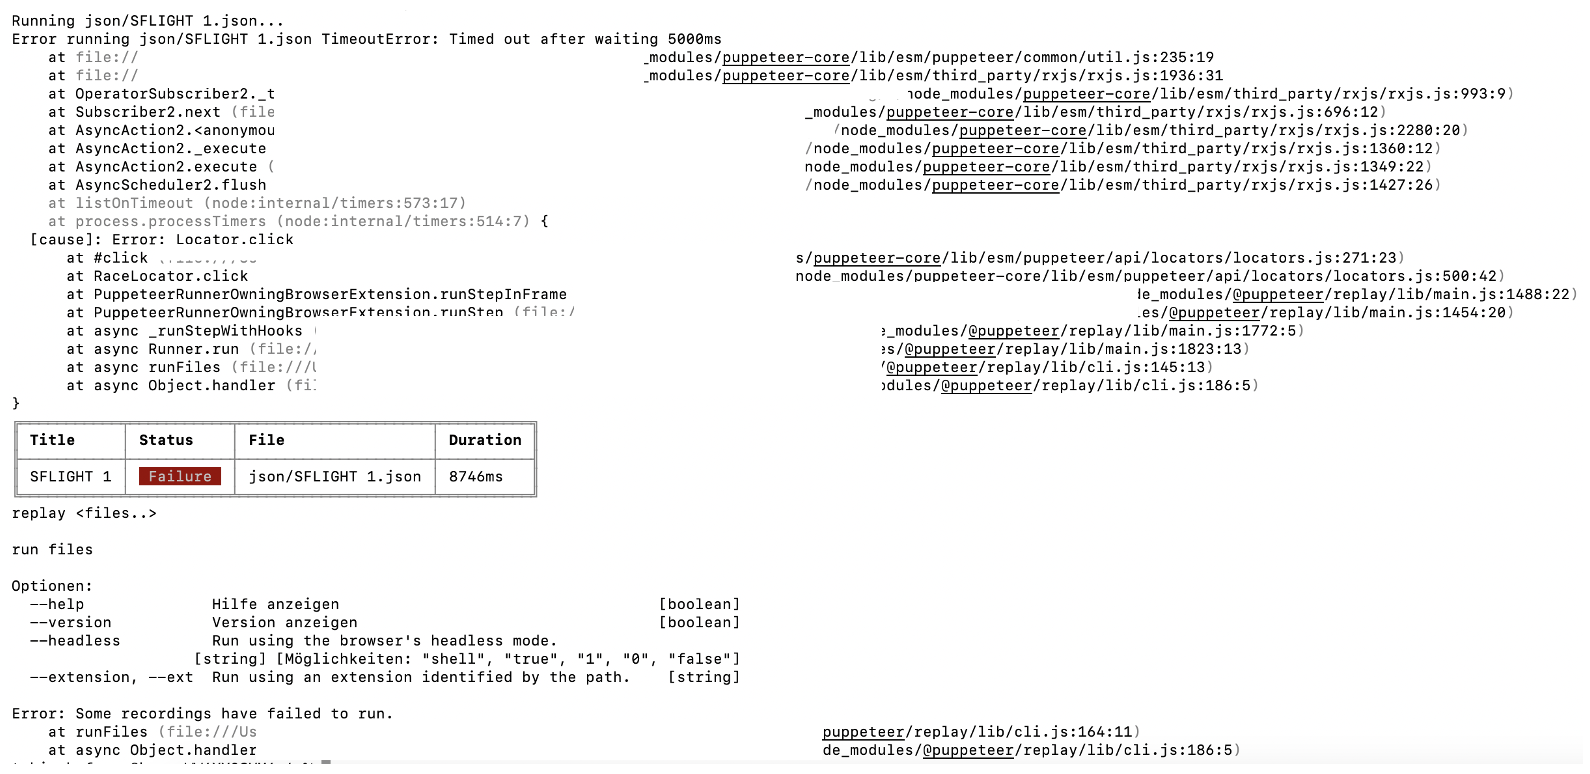
Running the same test with a Chrome attached means to provide –headless 0.
npx replay --headless 0 json/SFLIGHT\ 1.json
This allows to watch what the test does and how Chrome acts on the provided input. Here is a recording of the failed test run.

As the video shows: the app is opened, and nothing happens. No interaction. No value help is opened, no table filtered, no navigation to a detail page.
The reason for this is simple: replay starts a Chrome browser and uses the provided test script to control it. Inside the test script actions are defined like: wait for an element, and when it is found, click it. This is what happening. The first click event in the JSON test script is to click on the element that opens the value help dialog. The next click event is to select an item from the table in the value help dialog. The second click event is not working and causing the timeout.
Replay is not knowing if the click event triggered an action to open the value help dialog. It waits until the input for agency is part of the HTML. And then calls the click event on it. Just that UI5 is not fast enough in rendering the HTML and adding the event listener before replay triggers the click event. The click event of the test is therefore doing nothing. It is like clicking on an element with no event defined. UI5 adds the event listener later, but it’s too late. Replay moved on to the next step. The UI control was already called by replay. It then waits for the next element, and when that is only added after a previous action was made, like opening a dialog, the whole test stops. The event is not rendered, a timeout is given, and the test fails.
To make the test work, the test run must be adjusted to insert a certain wait time. This wait time must be sufficient to give UI5 the time it needs to add the event listeners. Drawback: this will make the test runs longer.
It is possible to customize replay by providing an extension. The readme contains a nice example of such an extension. Adjust the example to add a timeout. Adding a 2 second timeout in method beforeEachStep ensures that replay will wait 2 seconds before running the given step. This should give UI5 enough time to add all the listeners.
async beforeEachStep(step, flow) {
  await super.beforeEachStep(step, flow);
  // timeout. Wait for 2 seconds so UI5 loads and the elements are loaded and clickable
  await new Promise(r => setTimeout(r, 2000));
}
Now replay can be run using the extension. To make the extension work, change the module type of the test project to module.
package.json:
"type": "module",
Run the test again, this time with the custom extension.
npx replay --headless 0 --ext extension.js json/SFLIGHT\ 1.json
The test will now pass.

Result video: Test working with extension.mov

This is the status of the project after checking out branch: 4-solve-timeout-problem.
Step 5: Running all tests
Using the custom extension in all tests by adding it to the npm test script in file package.json
"test": "replay --ext extension.js json"
Run all tests in folder json:
npm test
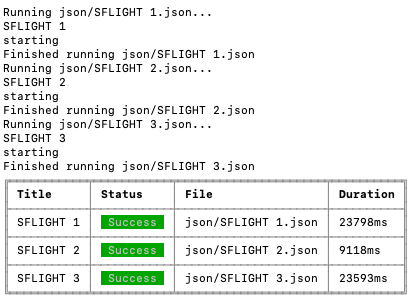
This is the status of the project after checking out branch: 5-run-all-tests.
Conclusion
Using the custom extension allows to automatically run all user recorded tests. Because of the waiting time to let UI5 not only render HTML, but also to add logic to it, the tests take a little bit longer. But the tests now run successfully. Important: there is no change in the provided test file. The recorded user journey is not touched. The same test that is recorded by the user, that can be run in the browser, can be used by the developer to validate the app. Besides providing the extension for replay, there is still no coding involved. The app is run as is, and so are the test files.
0 Comments