Setup OpenVPN server on Amazon EC2
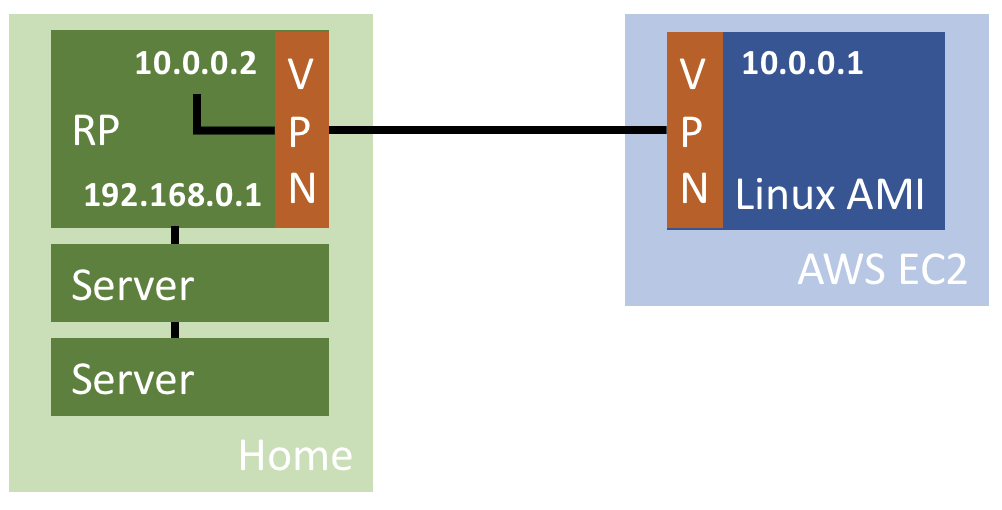
Recently I got some new hardware that I will use to run some useful software. To use the software from anywhere, I’ll need to have remote access. As I cannot do DMZ or port forwarding with my new internet provider, I decided to connect my home server using VPN to a access machine running on AWS.
The AWS EC2 Linux computer will serve as my entry point. Services running on the RP at home connected via VPN can be accessed from EC2. Other computers at my home cannot be accessed, as the IP is different and no route is configured.
This setup comes with several architectural questions to solve:
- How to ensure the communication is secure?
- How to guarantee the tunnel is up?
- How to enable access from EC2 to the services running on the client?
- The client must be assigned the same IP for the services be accessible from EC2
- How to give access to the services from the internet?
The three top question will be answered in my next blogs about how to set up OpenVPN server and client. The first question is the easiest to answer: by using a VPN solution. I am going to use OpenVPN and this blog is about how to setup OpenVPN. I’ll cover the installation on the EC2 instance and on the Raspberry Pi, as well as the initial setup with the certificates, server and client configuration and how to connect. Starting the client and server as service keeps them running and in case the connection fails, an automatic reconnect is attempted. The EC2 instance can access the services running on the client automatically. The last two questions will be answered sometimes later.
OpenVPN Server
Install OpenVPN on EC2
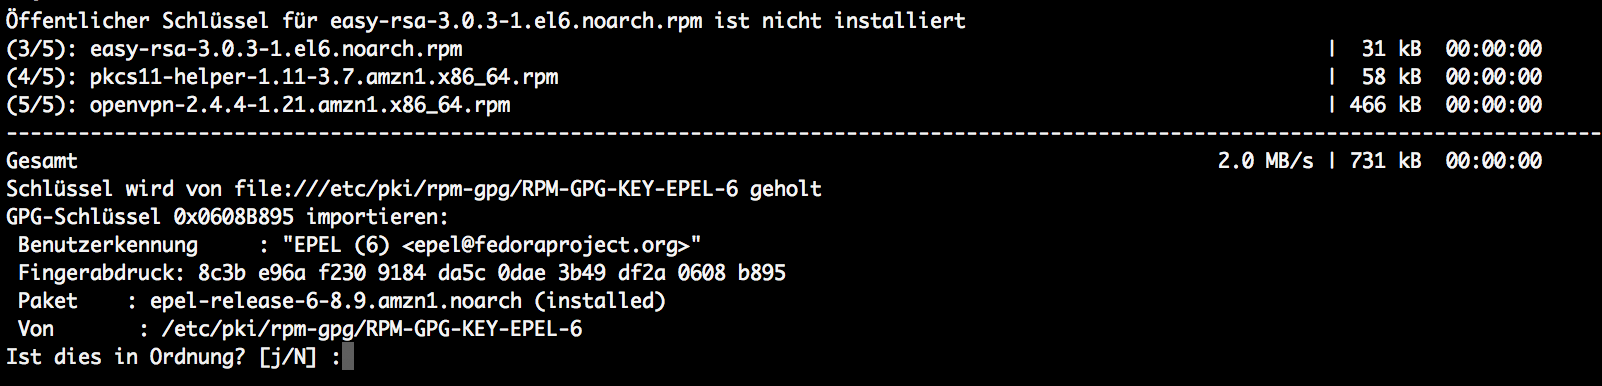
The OpenVPN software is available in yum on EC2 Linux AMI. You may need to enable the REPL repository. I assume you did this already. The packages to install a openvpn and easy-rsa.
sudo yum update
sudo yum install openvpn easy-rsa
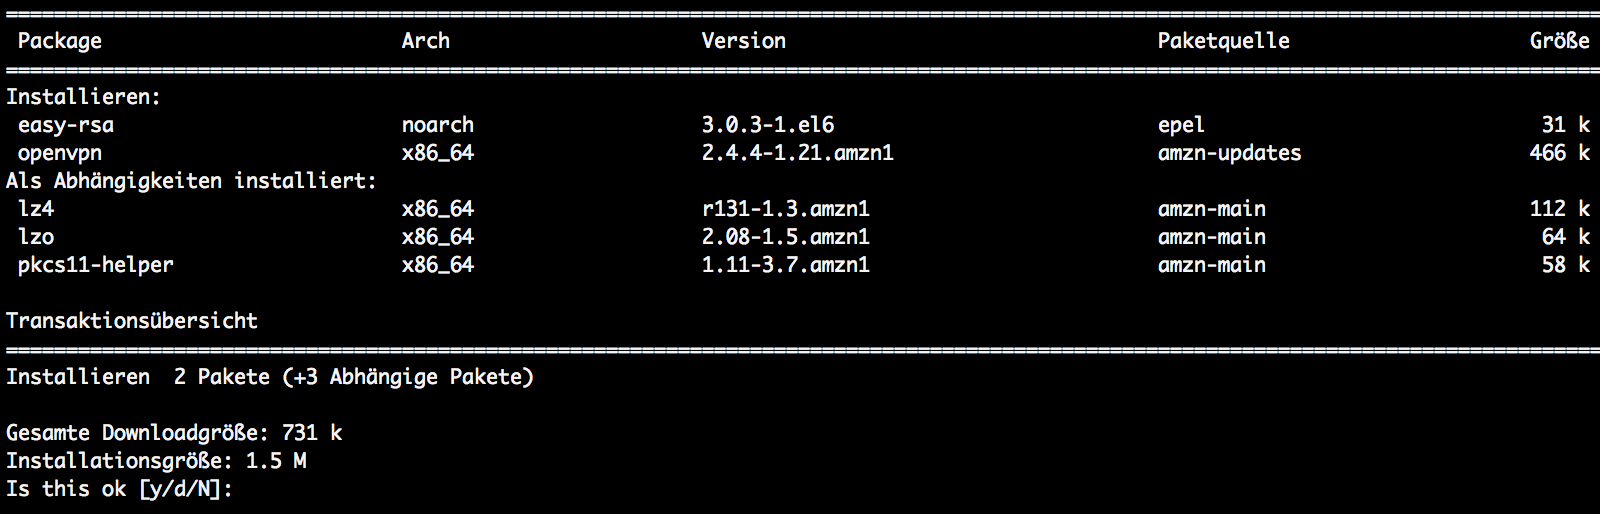
This will also install a public key to install a package and ask for your permission to do so.
The easy-rsa package is needed to set up a certificate authority. In case you do have a CA available, you can use your CA to generate the certificates used by OpenVPN. For those that do not have a CA available, take the easy-rsa functionality.
Generate CA
The command above installs easy-rsa 3.x. With 3.x, the way how to use easy-rsa and to set up a CA and issue the certificates changed. You can see in detail how to use easy-rsa 3.x at the documentation available at the GitHub project site.
OpenVPN uses certificates, and easy-rsa issues those certificates. Basically, you have two components of easy-rsa to deal with:
- CA software
- Certificates
Configuration of OpenVPN is put and read from /etc/openvpn. Easy-rsa software should be in a separate folder, like /home/ec2-user/easy-rsa, but to keep all in one place I’ll put easy-rsa inside the /etc/openvpn directory.
Note: for real productive usage, don’t do this. Separate easy-rsa executables and config files.
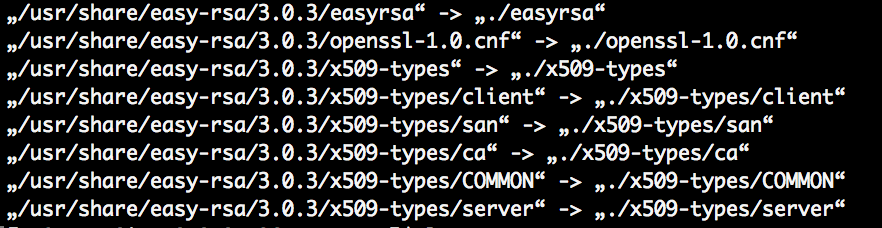
Copy easy-rsa
Copy easy-rsa to your selection location. For this, first find out where easy-rsa is installed.
repoquery -l easy-rsa
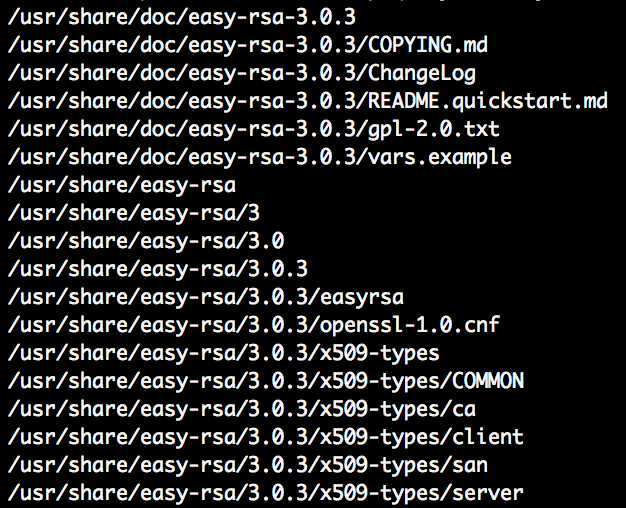
Location is /usr/share/easy-rsa/3.0.3. I’ll copy these files to /etc/openvpn/easy-rsa.
sudo mkdir /etc/openvpn/easy-rsa
sudo cp -Rv /usr/share/easy-rsa/3.0.3/* .
Start easy-rsa
Follow the steps outlined at the easy-rsa git site. For the following steps, go into the directory where easy-rsa is installed.
cd /etc/openvpn/easy-rsa
Init PKI
sudo ./easyrsa init-pki

Build CA
This will create the CA certificate to sign certificate requests. In other words: whoever gets access to the private key of the CA created in this step, can create new valid OpenVPN clients for your setup. Take care of the CA certificate and key.
sudo ./easyrsa build-ca
You’ll need to enter:
- PEM pass phrase
- Common Name
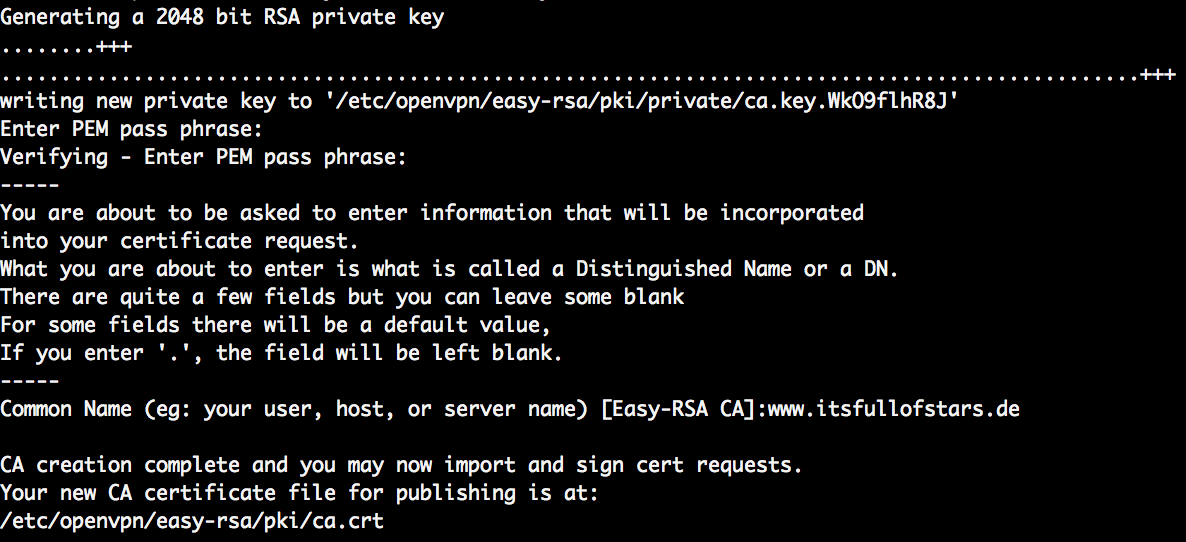
The passphrase is used to unlock the private key and is an additional level of security. Even when someone gets a copy of the private key of your CA, without the pass phrase the key is not usable. The common name is used to identify the CA. I used the FQDN of my web server. After execution these two commands, the CA is initialized and can be used to issue certificates.
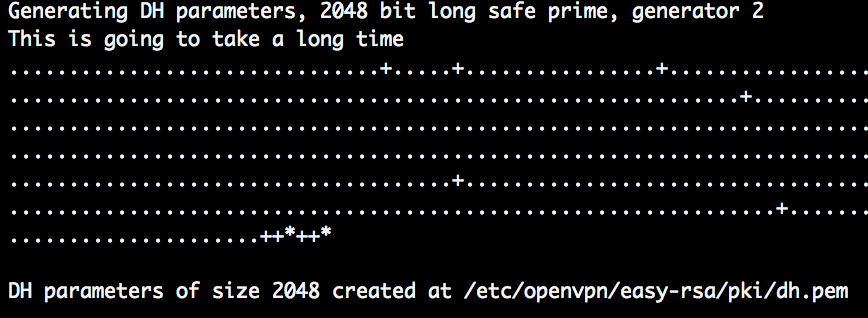
Diffie-Hellman
Generate Diffie-Hellman parameters.
sudo ./easyrsa gen-dh
Generate OpenVPN server certificate
The OpenVPN server needs a certificate issued by the CA to identify itself against the clients. This is a nice “feature” when using PKI. Server and client can validate the other side. Both need just to trust the CA certificate for this. The difference between the two certificates (client and server) is the included type. This is done by including an additional value in the certificate specifying the type of certificate:
- TLS Web Server Authentication for the server and
- TLS Web Client Authentication for the client
Which kind of certificate is going to be issued is specified by the easy-rsa command when creating the certificate request.
Generate certificate request
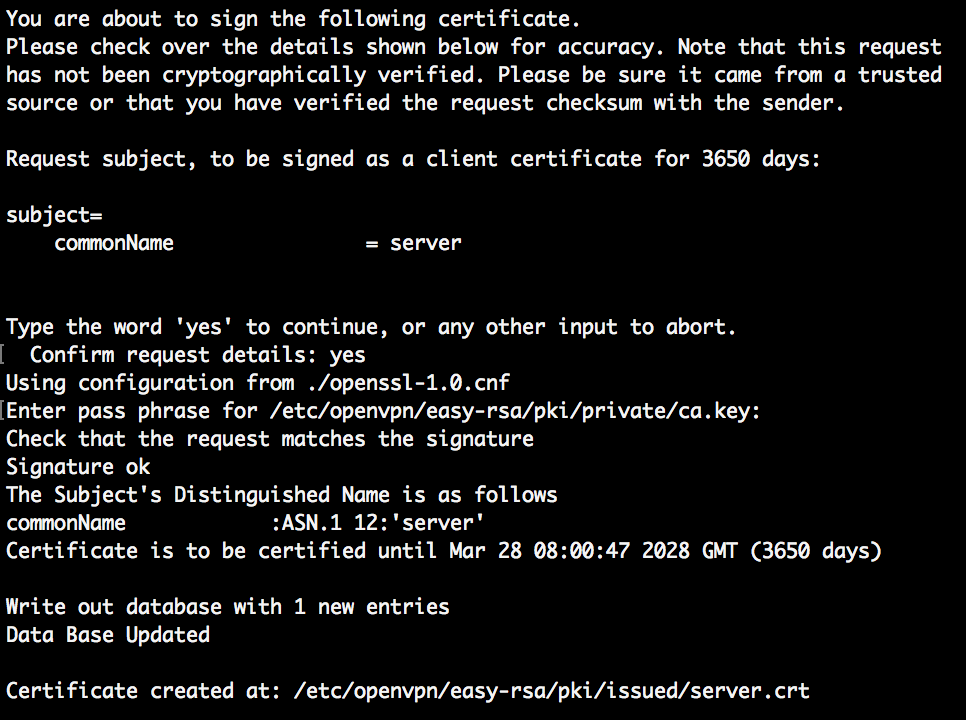
Create a certificate request containing the identity information of the server and let this request be signed by the CA. By specifying the server parameter, the request is for a server and the CA will include the value TLS Web Server Authentication in the extension.
sudo ./easyrsa gen-req server
Inform:
- Pass phrase
- Common Name
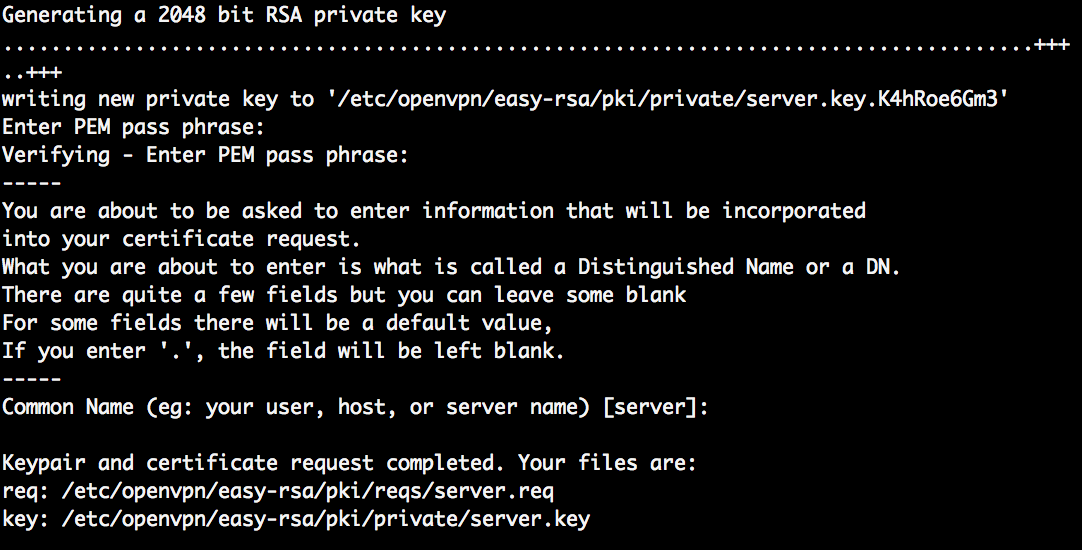
As with the CA certificate, inform a pass phrase that adds additional security to the private key and a common name to uniquely identify the server. I used server as CN. Of course, it could also have been openvpn.mydomain.com or something else.
Sign request
Send the request to the CA and sign it to issue a valid certificate. With that, the CA information is added to the CA, making it official and clients that connect to OpenVPN server will know if they can trust the server. Only when trust is verified, a connection will be established between the server and client.
sudo ./easyrsa sign-req server server
You’ll need to confirm the request by typing yes and the pass phrase.
TLS-AUTH
The following certificate is needed to harden the overall security of OpenVPN. As OpenVPN is using TLS, it makes sense to add HMAC to validate integrity of the packages received. For this to work, a shared secret key is needed. This key will be written to a file named ta.key.
Generate ta.key
cd /etc/openvpn
sudo openvpn --genkey --secret ta.key
sudo mv /etc/openvpn/ta.key /etc/openvpn/easy-rsa/private/ta.key
OpenVPN server configuration
Take a sample configuration file as a template. Can be found in the doc folder of openvpn. The sample configuration file for the server is server.conf, and for the client, client.conf.
ls -1 /usr/share/doc/openvpn-2.4.4/sample/sample-config-files/

Copy server.conf to /etc/openvpn and edit the file.
sudo cp /usr/share/doc/openvpn-2.4.4/sample/sample-config-files/server.conf /etc/openvpn/
sudo vim /etc/openvpn/server.conf
Adjust the path to the ca, cert, key and dh files
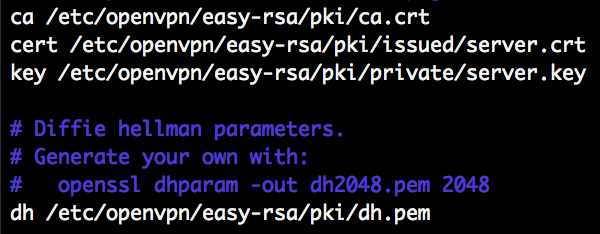
These parameters inform OpenVPN where the certificates and Keys are stored. The CA cert ca.crt is used to validate the client certificates. They must be issued by this CA. The server.crt and server.key are used by the OpenVPN server to encrypt traffic and authenticate itselfs against clients. Diffie hellman dh.pem is used to provide Perfect Forward Secrecy.
Start OpenVPN server
To start the OpenVPN server and to test the current setup, run the following command:
sudo openvpn /etc/openvpn/server.conf
During startup, you need to provide the passphrase of the server certificate.
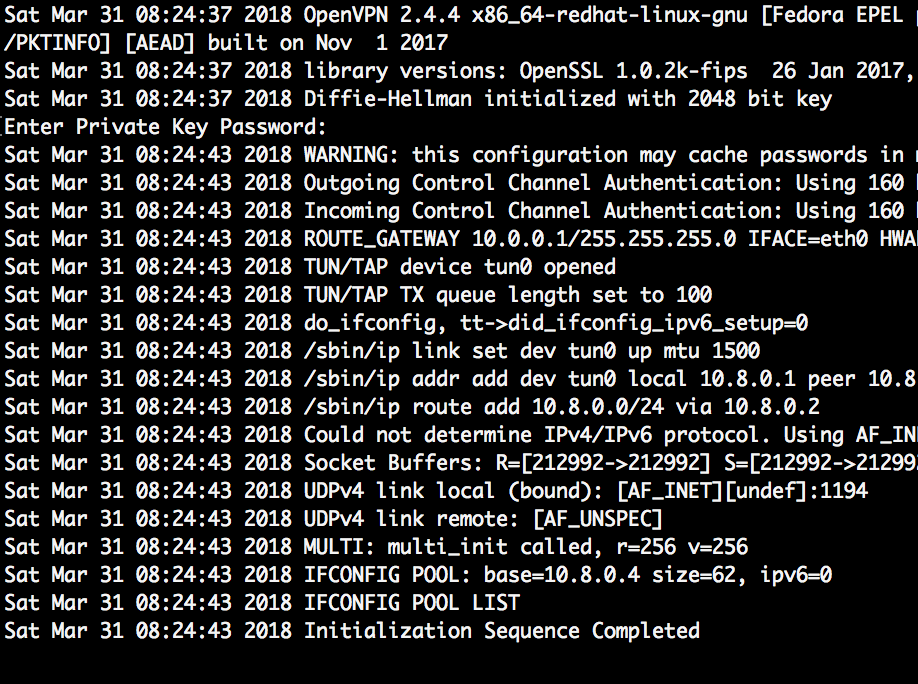
If all works, OpenVPN starts without erros: Initialization Sequence Completed. After this, the server is waiting for clients to connect.
Note:
If someone is reading my blogs for the last years you may remember that I have once written about setting up OpenVPN for accessing SUP on AWS. That blog was all about Windows and is outdated. I wrote it in 2012. But, as I published it once at SAP Community Network, it is not available anymore. SAP lost it during their last migration.
23 Comments
John · May 15, 2018 at 12:31
Hey this is great all works, i am just trying to make the service run at start up i tried nohup but cannot get it to work, also are we referencing the server.conf associated with the openvpn service, can we place this file in the same directory as openvpn so we can use the nohup command to have it run in the background
sudo openvpn /etc/openvpn/server.conf
i tried nohup ./openvpn > openvpn.log 2>&1 & but exits after i go to next line.
Also will be great if you provide tutorial on how to generate certificates and revoke them i know adding this line at the bottom of your server.conf file allows this.
Tobias Hofmann · May 16, 2018 at 10:00
Hi John,
to run OpenVPN as a service see my blog https://www.itsfullofstars.de/2018/04/setup-openvpn-troubleshooting/
No need for nohup, as OpenVPN comes with the scripts needed to be run as a service during system startup. For instance, to active the service:
sudo chkconfig –add openvpn
John · May 16, 2018 at 22:20
Thanks Tobias, i now have another problem now, i recreated the steps again to have this in another enironment however everything goes well until i try to start the service, the problem is it never starts. I checked at the logs and i have:
Wed May 16 20:13:59 2018 WARNING: cannot stat file ‘ta.key’: No such file or directory (errno=2)
Options error: –tls-auth fails with ‘ta.key’: No such file or directory (errno=2)
Options error: Please correct these errors.
i searched google and it mentions the directory being incorrect for it, but in the server.conf it is the same directory. I opted for the ‘put software in /home/ec2-user directory’
appreciate the response,
Tobias Hofmann · May 17, 2018 at 17:50
Hi John,
do you have the ta.key file?
Generation: https://www.itsfullofstars.de/2018/04/setup-openvpn-server-on-amazon-ec2/
Troubleshooting: https://www.itsfullofstars.de/2018/04/setup-openvpn-troubleshooting/
br,
Tobias
John · September 28, 2018 at 17:13
I think the line `sudo mv /etc/openvpn/ta.key /etc/openvpn/easy-rsa/private` is incorrect.
Just do:
$ cp /etc/openvpn/easy-rsa/private /etc/openvpn/ta.key
Tobias Hofmann · October 10, 2018 at 13:04
Hi John,
depends on the location of the ta.key file in server.conf. By default, it is in /etc/openvpn/ta.key. I moved it from there to make it aligned with the location of the other key / certs. You only have to make sure that openvpn can read the file.
Default configuration for ta.key
# The server and each client must have
# a copy of this key.
# The second parameter should be ‘0’
# on the server and ‘1’ on the clients.
tls-auth ta.key 0 # This file is secret
大番薯 · May 15, 2019 at 18:52
In Amazon Linux 2 or CentOS 7, OpenVPN comes with systemctl support by default.
Place your server configuration file in /etc/openvpn/server
Use the openvpn-server@.service like so:
$ sudo systemctl start openvpn-server@{Server-config}
Ricardo Gutiérrez · July 13, 2018 at 01:08
Excellent!
Thanks a lot for the article, may I write something related in Spanish; it’s so helpful.
Chris Allen · December 14, 2018 at 17:53
What a great article. I had my openvpn server up and running in no time!
Thanks very much!
Matteo · January 31, 2019 at 11:55
Hello, there’s a mistake:
sudo mv /etc/openvpn/ta.key /etc/openvpn/easy-rsa/private
will move “ta.key” file to “private” file
the correct commands should be:
sudo mkdir /etc/openvpn/easy-rsa/private
sudo mv /etc/openvpn/ta.key /etc/openvpn/easy-rsa/private/ta.key
Eli · March 29, 2019 at 07:23
what he said =)
Julien · October 25, 2019 at 11:34
Took me a few minutes to spot this error, I should have looked at the comments first 😉
Tobias Hofmann · November 1, 2019 at 10:14
Fixed the command and ta.key is now moved to private/ta.key
Hope the commands are now working.
Vignesh N · February 21, 2020 at 19:06
I did the setup as shown in this but after connecting to the VPN, my device does not have internet connection. I am using Amazon Linux 2.
Tobias Hofmann · August 26, 2021 at 13:11
The setup shown here allows a client to connect to an OpenVPN server. The client can then access resources on the server, and vice versa. For internet access your client must use another route. Anything that is not going to the OpenVPN server must not use the tun0 device.
If you want to connect to the internet through the VPN, you’ll have to adjust the OpenVPN configuration to allow this.
Waleed · May 28, 2020 at 11:51
How can I connect client to this server?
Tobias Hofmann · August 26, 2021 at 13:08
Hi Waleed,
you need an OpenVPN client. The OpenVPN web site lists one: https://openvpn.net/vpn-client/
Sam · August 21, 2021 at 04:45
Thank you and I was able to run the server. However, how do we connect to this server through a desktop client? As the desktop client requires config file / username password?
Tobias Hofmann · August 26, 2021 at 13:07
Hi Sam,
you’d need to use a VPN Client that supports OpenVPN and certificate based authentication.
H.A. · October 24, 2021 at 05:03
Great tut for setting up an OpenVPN “server”. Thanks for posting, it was actually very easy for this newbie to follow along. However, I would like to point out that you’re assuming that once its set up, that the individual following your tut will be able to connect via the client. I have no idea how to do that. I don’t really know what or how to create the needed client opvn file nor how to add or include the needed info to connect to the client with my now up and running VPN server… its kinda like learning how to make a bow but not the arrows… may seem simple enough to the bow maker but not a new apprentice. Just thought to share my experience.
Tobias Hofmann · October 24, 2021 at 19:34
For that reason I have another blog psot that describes how to create an OpenvPN client:
https://www.itsfullofstars.de/2018/04/setup-openvpn-client-on-raspberry-pi/
And one for testing the correct setup of server + client:
https://www.itsfullofstars.de/2018/04/openvpn-connection-test/
as well as one for troubleshooting some known issues:
https://www.itsfullofstars.de/2018/04/setup-openvpn-troubleshooting/
rajat · December 14, 2021 at 03:38
great tutorial!
i got my OpenVPN Server up and running following your tutorial
i was wondering if two clients that are connected to this OpenVPN Server can talk to each other as they would in a local network
thank you so much for this! 🙂
buzz · February 24, 2022 at 19:40
I tried to adapt this to the OpenVPN AS, but it didn’t quite work. Files are in in the right places–and filenames (e.g., “easyrsa”) do not exist. the package manager for OpenVPN AS is APT rather than yum. Many other differences as well. Should I abandon OpenVPN AS in favor of a straight forward ec2 instance to follow this tutorial?
Thank you,
buzz